Making Your Own Tiny Treehouse
/
I never had a treehouse growing up, but that didn't stop me from dreaming about what my ideal treehouse would include. I even had drawings that included my dream treehouse that doubles as a home for my dream pets, gibbons. Yes, I dreamed of sharing my treehouse with gibbons. I didn't take into account the cleaning up after monkeys part of this but that's what dreams are for.
My treehouse fascination hasn't really subsided, I asked for Treehouses of the World for my 15th birthday. The author, Pete Nelson, has a TV show, Treehouse Masters and I love it! I maintain that I will get my treehouse one day but for now I came up with a substitute that can live amongst my indoor trees, my houseplants.
You can make a mini treehouse for your houseplants and terrariums too!

Supplies
Materials
Template
Iron on Veneer (there are many sizes and colors veneer, I chose this type because it was available at the local hardware store. Project can be adjusted to whatever type you find.)
Cardstock
Acrylic Paint
Gorilla Glue Pen
3/16" Dowel Rod (or similar size)
Tools and Household Items
Scissors
Iron
Press Cloth (this is just a scrap rag that goes between your iron and the material you are ironing)
Small Clamps
Utility Knife
Twine
Tape
Metal Ruler
Drill
3/16" Drill bit (same size as your dowel rod)
Directions
The first step is to download the template and cut out the pieces.
Now, heat up your iron to the cotton setting and cut 4 strips of the veneer that are 1/2" longer than the main piece of the template.
Lay the first piece of veneer on your cardstock, glue side down, cover with your press cloth (protects your iron from any extra glue) and apply heat from your iron until the veneer is stuck to the paper (15-30 seconds). Use a pen or a bone folder to run over the veneer to even out the glue and the seal.
Add the next strip of veneer, slightly overlapped with the first piece, and apply heat from the iron (use your press cloth!). Repeat with the next two pieces.
Make sure that this creates a surface that is big enough for your template to fit on and not extend beyond the edges of veneer. If it isn't big enough, just add another strip of veneer.


Use double stick tape, or tape loops to fasten your template to the veneer.
The trick here is to go nice and slow. You're going to use your utility knife and ruler to cut around the edge of the template. Line the ruler up with the edge and use it as the guide for your knife.
Some general safety guidelines: When you use the ruler as a guide, make sure the ruler is on the side with the most material, and you cut on the side with less area. This just gives you more material to hold onto and it's safer to cut. See the pictures below.

Incorrect, with ruler only covering the sliver being cut off.

Correct, with ruler on the side with most material and cutting off a small sliver. If you are left handed this is perfect, if you are right handed, rotate so your left hand holds the ruler and your right hand wields the knife.
The second safety consideration is about using the utility knife. You are not going to cut this in one fell swoop. You have much more control if you cut it in many shallow cuts. Each edge could take 5-10 swipes to cut through the veneer and the paper. Just be patient, it's not worth slicing your finger to finish the project. If you start to get frustrated, just walk away for a few minutes and come back to it.
After the shape is cut out you can score the fold lines using the same knife and ruler. Scoring is cutting through the top layers of material to make folding easier. You don't cut all the way through. For comparison, this stage will take about 2-3 swipes with the knife.


Carefully fold along the score marks, apply glue to the wall tab and clamp closed for about 30 minutes. Wipe excess glue off of the edge while it's wet. I chose this glue because it's waterproof and will hold up to the moisture from plants, but it does dry white and it expands, so use it sparingly and wipe off excess while it is still wet.

While the house is drying, cut four short strips for the roof and iron the veneer on the cardstock in the same layered fashion used for the main part of the house. After the drying time, add glue to the roof tabs and lay the roof on top of the house. I couldn't figure out a good way of clamping the roof to the top, so I went with the old school method of wrapping the house in twine to firmly hold the roof in place. Again, wipe excess glue while it is wet.


While the roof is drying, you're going to iron the veneer for the porch. For this application, iron on the veneer side by side. It will look more like decking as opposed the siding of the house. To protect the backing paper from moisture and to add strength, on one side the veneer will lay up and down and on the back the veneer will lay left to right (perpendicular). This will prevent the deck from buckling when we attach the stick, or over time from moisture.
Since the porch veneer is thinner, I used some junky scissors (so the veneer wouldn't dull sharp scissors) to cut the porch out.

Side by side veneer, on the OPPOSITE side the veneer lays perpendicular

Using scissors to cut out porch
Use the glue and twine method to attach the house to the porch.
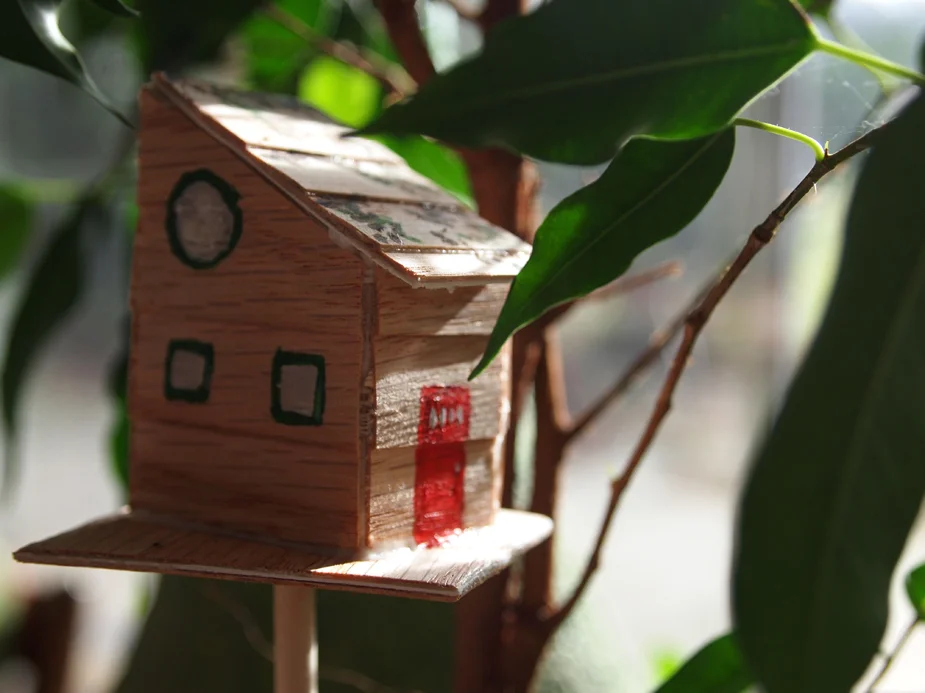
Once the house is attached after the drying time, use acrylic paint to add details to your house. I added windows with green edging and used some gray paint to represent the reflections on glass. I added a pop of color with a red door and then used green and brown in splotches to add some moss on the roof. You could glue natural materials on to your house to add character, like moss or small twigs; I wanted to wait to see how the house ages in the plant environment before I add too much.


Wait 24 hours to make sure that your house and all the glue has time to completely dry. Use your drill with a drill bit matching the size of your dowel. Drill the hole where it will be hidden by the house and the end of the dowel will be inside the hollow part of your house. Go slow and be careful not to drill through your roof or your hand for that matter.
Next, add some glue to the edges of the drilled hole and fit the dowel rod into the hole. Leave it for a few hours for the glue to dry.